IOS ZENGGE Sdk接入
1.开发前准备
1.1 CocosPod环境
本sdk依赖cocopod环境,请先确保项目已初始化cocospod框架
1.2 引入ZGLedSdk.framework
将提供的ZGLedSdk.framework拖入工程项目即可
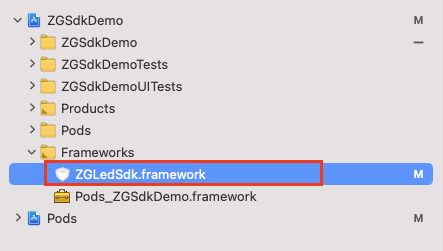
同时在工程中通过CocoPods引入sdk所需三方库
  pod 'CocoaAsyncSocket', '~> 7.4.3'
  pod 'NSDate+Calendar', '~> 0.0.8'
  pod 'NSDate+Helper', '~> 1.0.4'
  pod 'JSONModel'
  pod 'MQTTClient', '~> 0.15.3'
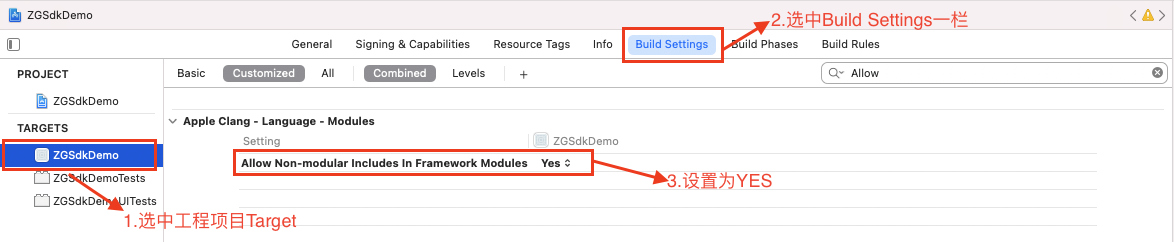
1.3 项目设置
在工程项目的target->Build Settings->Allow Non-modular Includes In Framework Modules 设为YES
在工程项目的target->Build Settings->Linking->Other Link Flags增加-ObjC标记

1.4 项目参数设置
新建一个配置文件,供后续参数输入
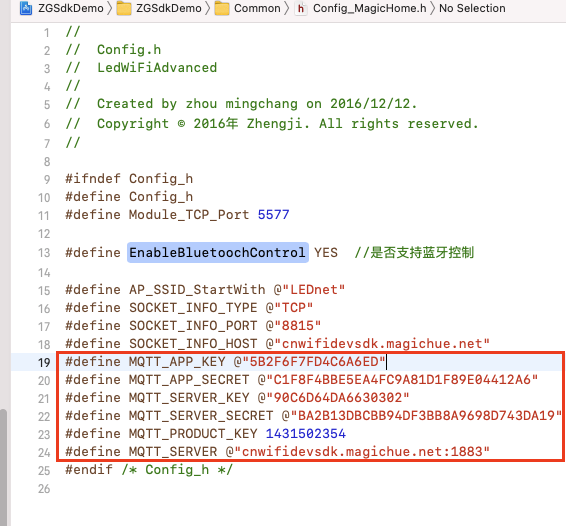
具体参数请到http://cnwifidevsdk.magichue.net获取
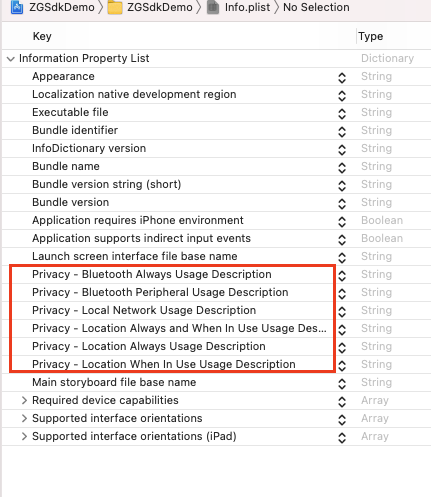
1.5 申请权限
请在项目info.plist加入相关权限
1.6 sdk使用
在需要sdk的文件中引入头文件即可
#import <ZGLedSdk/ZGLedSdk.h>
2.设备配网
2.1 搜索出所有可配网设备
2.1.1 声明类ZGBletooth
@property(strong,nonatomic)ZGBluetooth* bluetoothScan;
2.1.2 初始化ZGBletooth
self.bluetoothScan=[[ZGBluetooth alloc] init];
[self.bluetoothScan setBlockOnDiscoverToPeripherals:^(CBCentralManager *central, CBPeripheral *peripheral, ZGAdvertisementData *zgData, NSNumber *RSSI) {
NSLog(@"BLE 搜索到了设备:%@  RSSI:%d  macAddress:%@",peripheral.name,RSSI.intValue, zgData.macAddress);
//TODO  do what you want to do
}];
2.1.3 开启扫描
[self.bluetoothScan startScan]
2.2 选择需配网设备
2.2.1 根据先前扫描的原始信息生成sdk的蓝牙设备类
-(void)onSearchedCBPeripheral:(CBPeripheral *)peripheral  advertisementData:(ZGAdvertisementData*)advertisementData
{
    if (advertisementData.stateMode != BLE_StateMode_AP || advertisementData.manufacturer != 23122) {
        NSLog(@"条件不符合");
        return;
    }
    NSString *macAddress = advertisementData.macAddress;
    int deviceType = (int)advertisementData.productId;
    int ledVersion = (int)advertisementData.ledVersion;
    LedDeviceInfo *dev = [[LedDeviceInfo alloc] initWithMacAddress:macAddress];
    [dev setMacAddress:macAddress];
    [dev setDeviceType:deviceType versionNum:ledVersion];

    SearchBLEDevcie *itm = [[SearchBLEDevcie alloc] init];
    itm.advertiseData = advertisementData;
    itm.peripheral = peripheral;
    itm.deviceInfo = dev;
}
2.2.2 建立蓝牙连接,获取设备网络信息
功能所需类
@property(strong,nonatomic) ZGBluetoothClientBase *bleClient;
通过ZGBletooth给bleClient初始化
LEDNetWFDevice* device=self.deviceArray[indexPath.row];
self.bleClient = [self.bluetoothScan createClientWithDevice:device];
生成ZGBluetoothSettinigManagerBase用于蓝牙请求
ZGBluetoothSettinigManagerBase *mgr;
if ([self.bleClient isKindOfClass:ZGBleClient.class]) {
   mgr = [[ZGBluetoothSettinigManager alloc] initWithClient(ZGBleClient*)self.bleClient];
}
else{
   mgr = [[ZGNotifyBluetoothSettinigManager alloc] initWithClient:(ZGNotifyBleClient*)self.bleClient];
}
通过蓝牙请求网络信息
[mgr getNetworkWithSuccess:^(CustomDataNetworkInfo * _Nonnull networkInfo){

 } failure:^(NSError * _Nonnull error) {

}];
2.3 请求设备可用的Wifi列表
    [mgr getWifiListWithSuccess:^(NSArray<NetworkWiFiItem *> * _Nonnull wifiList) {

      } foundWifiListCallBack:^(NSArray<NetworkWiFiItem *> * _Nonnull wifiList) {

      } failure:^(NSError * _Nonnull error) {

    }];
2.4选择Wifi,输入密码进行设备本地配网和远程服务器配网
硬件连接所选wifi
[mgr connectWifi:ssid pwd:password withWithSuccess:^(NetworkWiFState * _Nonnull networkInfo) {
      __strong __typeof(self) strongSelf = weakSelf;   //避免执行一半,weakSelf 变空

      if (networkInfo.state == WIFI_STATE_PSK_ERROR){
          //密码错误
      }else if (networkInfo.state == WIFI_STATE_NO_AP_FOUND){
          //AP无法找到

      }else if (networkInfo.state == WIFI_STATE_DISCONNECT || networkInfo.state == WIFI_STATE_IDLE){
          //断开或者获取不到ip,兼容性问题,重试3次, 一般距离比较远的话很容易发生
      }else{
          //成功或其他情况
      }
 } failure:^(NSError * _Nonnull error) {

}];
硬件与远程服务器配网
NSString *appSockInfo =  [NSString stringWithFormat:@"%@,%@,%@",SOCKET_INFO_TYPE,SOCKET_INFO_PORT,SOCKET_INFO_HOST];
NSString *uuid = @"";
long app = 0;
LEDNetWFDevice* device=self.bleClient.device;
if ([device isKindOfClass:SearchBLEDevcie.class]) {
    if (((SearchBLEDevcie*)device).deviceInfo.moduleTypeInfo.enableIncomingAppInformation) {
        uuid = [[[NSUUID UUID] UUIDString] replaceAll:@"-" with:@""];
        app = MQTT_PRODUCT_KEY;
    }
}
[[self createBLESettingManager] configServerWithAppSockInfo:appSockInfo uuid:uuid app:app  callBack:^{

} failure:^(NSError *error) {

}];
注:上面代码中的SCOKET_INFO_TYPE,SOCKET_INFO_PORT,SOCKET_INFO_HOST,MQTT_PRODUCT_KEY均为之前配置文件内,请自行填自身对应好的信息
2.5 获取设备网络信息
[mgr getNetworkWithSuccess:^(CustomDataNetworkInfo * _Nonnull networkInfo){
        if (networkInfo.LANcode==0) {
             //LANcode==0代表整个配网流程已成功
             LedDeviceInfo* deviceInfo=((SearchBLEDevcie*)weakSelf.device).deviceInfo;
            deviceInfo.uuid=uuid;
            deviceInfo.joinWifiSSID=wifiInfo.ssid;
             //配网后进行本地存储,供获取用户自身已配网的设备用,项目接入请结合自身业务需要进行存储,请尤其要注意保存uuid,后续供Mqtt连接后订阅主题用
            [LedDeviceInfoDataMgr saveDeviceInfoForAddWiFi:deviceInfo];

        }else{
            NSLog(@"getNetwork Fail:LANcode->%d",networkInfo.LANcode);
        }
} failure:^(NSError * _Nonnull error) {

}];
3.设备控制
3.1 发现本地设备
精准定位权限申请
要使用发现设备功能在ios13以上需动态申请权限,请上网查阅或参考demo代码
获取当前Wifi ssid和当前在Wifi下的ip地址
WifiAdmin* wifiAdmin=[[WifiAdmin alloc] init];
NSString* ssID= wifiAdmin.SSID;
NSString *locaIp = [AppUtilities localWiFiIPAddress];
本地设备搜索
DeviceDiscove* deviceDiscover = [[DeviceDiscover alloc] initWithipAddress:locaIp] ;
[deviceDiscover setDelegate:self];
[deviceDiscover discoverInDepth];


#pragma mark - DeviceDiscoverDelegate
-(void)DeviceDiscover:(id)sender didProgressChanged:(float)progress
{
}
-(void)DeviceDiscover:(id)sender didFoundModule:(WifiModule*)module
{

}
-(void)DeviceDiscover:(id)sender didScanFinished:(NSDictionary *)modules
{

}
3.2 控制本地设备
3.2.1 通过TCP控制
tcp连接
LedControllerClientV3 client=[[LedControllerClientV3 alloc] initWithIP:ip   MacAddress:mac];
if (dev.deviceType==LED_TYPE_PassThrough) {
  //透传设备要做如下设置
   client.enableUnifiedCommand=YES;
}
[client addClientDelegate:self];
[client connectLEDDeviceAnsy];


#pragma mark - LedControllerClientDelegate
- (void)ledControllerClientConnected:(LedControllerClient *)client stateData:(NSData *)stateData
{

}

- (void)ledControllerClientFailed:(LedControllerClient *)client didFailed:(NSError *)error
{

}

- (void)ledControllerClientLosted:(LedControllerClient *)client didLosted:(NSError *)error
{


- (void)ledControllerClient:(LedControllerClient *)client didReceiveData:(NSData *)receiveData sn:(int)sn
{

}

- (void)ledControllerClient:(LedControllerClient *)client didChangedDeviceStateData:(NSData *)stateData
{

}
tcp命令发送
NSMutableData *data = [[NSMutableData alloc] init] ;
//数据组装,请自行根据协议组装
//.................
[client sendData:data];
3.2.2 通过MQTT控制
mqtt连接
AppMQTTClient* mqttClient=[[AppMQTTClient alloc] initWithAppKey:MQTT_APP_KEY
                           appSecret:MQTT_APP_SECRET
                           productKey:MQTT_PRODUCT_KEY
                           server:MQTT_SERVER
                           delegate:self];
[self.mqttClient startConnectMQTT];


#pragma mark - AppMQTTClientDelegate
- (void)appMQTTClient:(AppMQTTClient *)sender didAppMQTTClientStatusChanged:(AppMQTTClientStatus)status
{
    if (status == AppMQTTClientStatus_Connected) {

    }
    else if (status == AppMQTTClientStatus_ConnectFaild)
    {

    }
}

- (void)appMQTTClientSidAppMQTTClientDisconnected:(AppMQTTClient *)sender
{

}
mqtt订阅主题(订阅格式请参考)《ZENGGE 平台接入》
NSMutableDictionary<NSString*,NSNumber*>* subscribeDic=[NSMutableDictionary new];
[subscribeDic setValue:[NSNumber numberWithInt: MQTTQosLevelAtMostOnce]
 forKey:[NSString stringWithFormat:@"%ld/%@/deviceSubscribe",MQTT_PRODUCT_KEY,dev.uuid]];
[mqttClient subscribeTopics:subscribeDic tryCount:1 success:^(bool success) {
  NSLog(@"mqttClient subscribeTopics success");
}];
mqtt命令发送(发送格式请参考)《ZENGGE 平台接入》
NSMutableData *sendData = [[NSMutableData alloc] init] ;
//数据组装,请自行根据协议组装
//.................
[mqttClient sendData:sendData
ToTopic:[NSString stringWithFormat:@"%ld/%@/control",MQTT_PRODUCT_KEY,dev.uuid]//此处uuid为配网成功时返回的uuid
WithQos:MQTTQosLevelAtMostOnce];
mqtt信息接收
[[NSNotificationCenter defaultCenter] addObserver:self
selector:@selector(onDidReceiveMqttMessage:)
name:NotificationDidReceiveMqttMessage object:nil];