Android ZENGGE Sdk接入
1.开发前准备
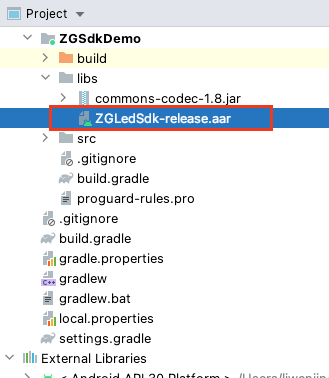
1.1 引入ZGLedSdk-release.aar和commons-codec-1.8.jar
将提供的ZGLedSdk-release.aar和commons-codec-1.8.jar拖入工程根目录的libs文件夹即可(若没有请自行创建)
并在项目module模块(该实例则是ZGSdkDemo module)下的build.gradle文件的dependencies代码块里,添加如下代码
implementation fileTree(dir: 'libs',includes: ['*.aar','*.jar'])
并引入如下库
  implementation 'org.fusesource.mqtt-client:mqtt-client:1.16'
  implementation 'com.google.code.gson:gson:2.8.6'
  implementation 'org.eclipse.paho:org.eclipse.paho.client.mqttv3:1.2.0'
  api 'io.reactivex.rxjava3:rxandroid:3.0.0'
  api 'io.reactivex.rxjava3:rxjava:3.0.1'
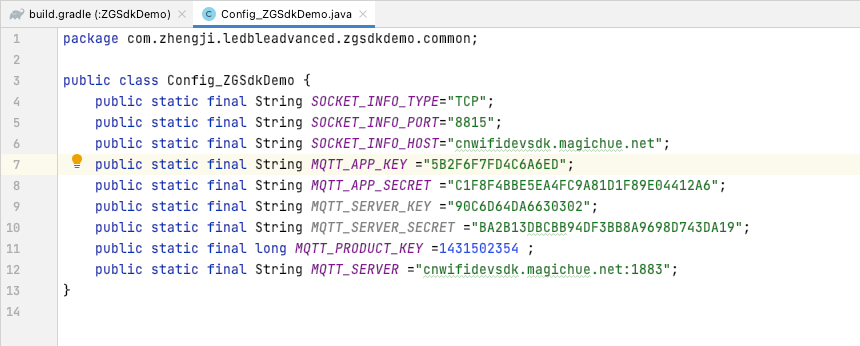
1.2 项目参数设置
新建一个配置文件,供后续参数输入
1.3 申请权限
在项目AndroidManifest.xml文件加入相关权限
  <uses-permission android:name="android.permission.BLUETOOTH" />
  <uses-permission android:name="android.permission.BLUETOOTH_ADMIN" />
  <uses-permission android:name="android.permission.ACCESS_COARSE_LOCATION" />
  <uses-permission android:name="android.permission.ACCESS_FINE_LOCATION" />
  <uses-permission android:name="android.permission.ACCESS_WIFI_STATE" />
  <uses-permission android:name="android.permission.ACCESS_NETWORK_STATE" />
  <uses-permission android:name="android.permission.INTERNET" />
2. 设备配网
2.1 动态权限申请
在Android6.0上使用蓝牙扫描功能需先动态申请android.permission.ACCESS_FINE_LOCATION,android.permission.ACCESS_COARSE_LOCATION权限,请上网查阅或参考demo代码
2.2 搜索出所有可配网设备
2.2.1 声明类BleScanClient
private BleScanClient bleScanClient;
2.2.2 初始化类BleScanClient
bleScanClient=new BleScanClient();
bleScanClient.listener(new BleScanClient.ScanListener() {
    @Override
    public void onScanDevice(LEDNetWFDevice ledNetWFDevice) {
        if (ledNetWFDevice==null)
            return;
        Log.i(TAG, "onScanDevice: "+ledNetWFDevice.getMacAddress());
        if (!checkIsContainInDeviceList(ledNetWFDevice)&&ledNetWFDevice.getSta() != 1 && ledNetWFDevice.getManufacturer() == 23122){
            // do what you want to do
        }
    }

    @Override
    public void onFailure(int errorCode) {
        Log.e(TAG, "onFailure code: "+errorCode );
    }
});
2.2.3 开启扫描
bleScanClient.start(this);//传入Context对象
2.3 选择需配网设备
2.3.1 根据蓝牙扫描返回的数据建立蓝牙连接
功能所需类
private BleService bleService;
通过BleScanClient扫描得到的LedNetWFDevice给bleService初始化
bleService = new BleServiceImpl(ledNetWFDevice, App.getCurrent());
bleService.setConnectionCallback(connectResult -> {
    if (connectResult) {
        Log.i(TAG, "BleClient: 连接成功 "+device.getMacAddress());
        //下面所有的配网交互操作都基于连接成功后进行
    } else {
        Log.e(TAG, "BleClient: 连接失败");
    }
});
bleService.connect();//开始蓝牙连接
2.3.2 通过蓝牙请求网络信息
bleService.checkNetwork(wifiNetworkInfo -> {

}, throwable -> {

});
2.4 请求设备可用wifi列表
bleService.wifiList(bleRouterWifiInfos -> {
    Log.i(TAG, "getWifiList success: ");
    wifiList.addAll(bleRouterWifiInfos);
    Collections.sort(wifiList, (o1, o2) -> o2.getR()- o1.getR());
}, throwable -> {
    hideLoadingDialog();
});
2.5 选择Wifi,输入密码进行设备本地配网和远程服务器配网
硬件连接所选wifi
//下面用到的wifi变量为上一步获取的BleRouterWifiInfo列表中的一个对象
BleServiceSelector.getService(ledNetWFDevice).configRouter(wifi.getS(), password, wifi.getA(), wifiState -> {
    switch (wifiState.getState()) {
        case WifiStateEnum.WIFI_STATE_PSK_ERROR:
            //密码错误
            break;
        case WifiStateEnum.WIFI_STATE_NO_AP_FOUND:
            //AP无法找到
            break;
        case WifiStateEnum.WIFI_STATE_IDLE:
        case WifiStateEnum.WIFI_STATE_DISCONNECT:
            //断开或者获取不到ip,兼容性问题,重试3次,一般距离比较远的话很容易发生
            break;
        case WifiStateEnum.WIFI_STATE_CONNECTED_IP_GOT:
        default:
            //成功或其他情况
    }
}, throwable -> {

});
硬件与远程服务器配网
String svcSockb = Config_ZGSdkDemo.SOCKET_INFO_TYPE+","+Config_ZGSdkDemo.SOCKET_INFO_PORT+","+Config_ZGSdkDemo.SOCKET_INFO_HOST;
String uuid = "";
long appFlag = 0;
if (this.deviceInfo.getModuleID().enableIncomingAppFlagForRemoteTCP()){
    uuid = UUID.randomUUID().toString().replace("-", "");
    appFlag = Config_ZGSdkDemo.MQTT_PRODUCT_KEY;
}
String finalUuid = uuid;
bleService.configCloud(svcSockb, uuid, appFlag, s -> {

}, throwable -> {

});
注:上面代码中的SCOKET_INFO_TYPE,SOCKET_INFO_PORT,SOCKET_INFO_HOST,MQTT_PRODUCT_KEY均为之前配置文件内,请自行填自身对应好的信息
2.6 获取设备网络信息
bleService.checkNetwork(wifiNetworkInfo -> {
     if (wifiNetworkInfo.getLANcode()==0){
        //LANcode==0代表整个配网流程已成功
         deviceInfo.setUuId(finalUuid);
         deviceInfo.setJoinWifiSSID(wifiInfo.getS());
       //配网后进行本地存储,供获取用户自身已配网的设备用,项目接入请结合自身业务需要进行存储,请尤其要注意保存uuid,后续供Mqtt连接后订阅主题用
         DataGroupDeviceMgr.SaveDeviceForAddWiFi(deviceInfo,ChooseWifiActivity.this,true);
         Log.i(TAG, "configToCloud success: ");
     }
}, throwable -> {

});
3.设备控制
3.1 发现本地设备
获取当前Wifi ssid和当前在Wifi下的ip地址
WifiAdmin wifiAdmin=new WifiAdmin(this);
String ssid=wifiAdmin.GetSSID();
int ip=wifiAdmin.GetIPAddress();
本地设备搜索
DeviceDiscover deviceDiscover=new DeviceDiscover(ip);
deviceDiscover.setListener(this);//DeviceDiscoverListener
try {
  deviceDiscover.discoverInDepth();
} catch (SocketException e) {
  e.printStackTrace();
}
deviceDiscover.discoverInDepth();


//DeviceDiscoverListener接口
public interface DeviceDiscoverListener {
  void onProgressChanged(DeviceDiscover sender, int progress);
  void onFoundModule(DeviceDiscover sender, Module module);
  void onScanFinished(DeviceDiscover sender, HashMap<String, Module> modules);
}
3.2 控制本地设备
3.2.1 通过TCP控制
tcp连接
LedControllerClientV3 client = new LedControllerClientV3(dev.getDeviceIp(),dev.getMacAddress());
if (dev.getDeviceInfo().getDeviceType()==BaseDeviceInfo.TYPE_PassThrough){
    //透传设备需做如下设置
    client.setEnableUnifiedCommand(true);
}
client.addListener(tcpEventListener);//LEDControllerClientListener
client.connect();


//LEDControllerClientListener接口
public interface LEDControllerClientListener {
    public void onConnected(LEDControllerClientBase sender, byte[] stateData);

    public void onConnecteFailed(LEDControllerClientBase sender);

    public void onLostConnect(LEDControllerClientBase sender);

    void onReceiveDeviceState(LEDControllerClientBase sender, byte[] stateData);

    void onReceiveDeviceResponse(LEDControllerClientBase sender, byte[] responseData, int sn);
}
tcp命令发送
byte[] data = new byte[dataCount];
//数据组装,请自行根据协议组装
//.................
client.sendData(data);
3.2.2 通过MQTT控制
mqtt连接
try {
    appMQTTClient=new AppMQTTClient(Config_ZGSdkDemo.MQTT_APP_KEY,                                      Config_ZGSdkDemo.MQTT_APP_SECRET,Config_ZGSdkDemo.MQTT_PRODUCT_KEY,Config_ZGSdkDemo.MQTT_SERVER);
    appMQTTClient.addEventListener(mqttEventListener);//MQTTEventListener
    appMQTTClient.startConnectMQTT();
} catch (Exception exception) {
    exception.printStackTrace();
    appMQTTClient.destroy();
    appMQTTClient=null;
}


//MQTTEventListener接口
public interface MQTTEventListener {

    //首次连接
    void onFirstConnected();

    //订阅成功
    void onSubscribe();

    //解除订阅
    void onUnSubscribe();

    //连接中
    void onConnecting();

    //连接成功
    void onConnected();

    //连接断开
    void onDisconnect();

    //接收消息
    void onReceive(String topic,byte[] payload);

    //exception
    void onFailure(Throwable throwable);
}
mqtt订阅主题(订阅格式请参考)《ZENGGE 平台接入》
String subscribeTopic=Config_ZGSdkDemo.MQTT_PRODUCT_KEY+"/"+baseDeviceInfo.getDeviceInfo().getUuId()+"/deviceSubscribe";
appMQTTClient.subscribe(new Topic[]{new Topic(subscribeTopic, QoS.AT_MOST_ONCE)});
mqtt命令发送(发送格式请参考)《ZENGGE 平台接入》
String publishTopicStr=Config_ZGSdkDemo.MQTT_PRODUCT_KEY+"/"+baseDeviceInfo.getDeviceInfo().getUuId()+"/control";
Map map=new HashMap();
map.put("type","device.hex");
map.put("body", ByteUtil.bytesToHexStringNoSpace(data));
String json=new Gson().toJson(map);
byte[] contentBytes= json.getBytes(StandardCharsets.UTF_8);
try {
    appMQTTClient.publish(new PublishTopic(publishTopicStr, QoS.AT_MOST_ONCE), contentBytes, null);
} catch (Exception exception) {
    exception.printStackTrace();
}
mqtt信息接收
见MQTTEventListener接口中的onReceive方法